I think this might be less than useful, but it keeps coming up in my mail. I love it that people are trying to make custom yard signs for their listings, but it seems plausible that the best technical advice will come in the comments.
Why is that? Because I use professional pre-press tools that most people don’t have.
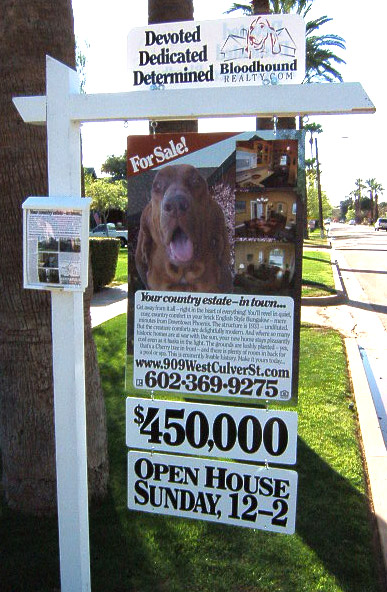
Our signs are made in QuarkXPress for the Macintosh at one-sixth scale. In other words, the big sign with the full-bleed photo is made at 25p6 x 37p6 — one pica scales to one inch. The reason for working at this scale is simply to keep the Quark files manageable.
When we’re dummying up a sign, I will often work with low-resolution versions of the photos, this to enable faster printing so we can see what the sign looks like.
For the finished version, I use Adobe PhotoShop to produce very high-resolution CMYK EPS photo files to be placed back in Quark, there to be scaled and positioned. It’s possible to do everything I’m talking about within PhotoShop, but Quark is much better for both positioning and typographic control.
We take our listing photos at 5 megapixels. The camera will do more than that, but since most of these photos are going to be down-sampled to 640 x 480 pixels, we make a trade-off between resolution and the number of available photos on the memory card.
For the smaller photos on our signs, I normally down-sample to 2400 x 1800 pixels at 300 pixels per inch. For the large photo, I normally up-sample to 16000 x 12000 pixels at 300 ppi. If you get very close to that big image on a sign, you’ll see some pixelization. This is not visible at normal distances.
Once everything is in place in Quark, I save the page as an EPS file. The raster images — the photos — will be encapsulated as is, with the positioning and scaling information conveyed in PostScript. The type, rules and logos are vector images, infinitely scalable.
I import the EPS file into PhotoShop, scaling it to 25.5″ x 37.5″ at 300 pixels per inch. This is a monstrously huge raster image, but from here I’m almost done: I save the file as a CMYK TIFF file, which is exactly what the sign printer eats as its native food. They love me at the sign print shop: My files require no pre-press work on their end.
The smaller signs are made by the same basic procedure, although that procedure is much easier without photos. Our custom directional signs use a hybrid of the procedure described here.
Everything then gets burned onto a CD-ROM. The sign printer we use doesn’t have robust FTP, and this quantity of data moves faster by sneakernet than it would by broadband anyway. I’m normally right around 700 megabytes for a full set of signs.
As I said, I don’t think this is all that useful. If you can already work this way, you don’t need me to teach you how. Most people will want some degree of participation from the sign vendor.
The most important piece of this puzzle, therefore, is the resolution of your photos. On TV, photos improve in quality when you enlarge them. On earth, where every real thing comes in finite quantity, spreading fewer pixels across a larger space will result in a progressive loss of image quality. A photograph that is going to print well should be over-sampled for the device it’s printing on.
Now: If other people who are making custom yard signs will tell us how they are working, we’ll know something worth talking about.
Technorati Tags: real estate, real estate marketing, real estate photography, real estate training, technology
Michelle Minch, Moving Mountains Design & Staging says:
Greg: As a home stager, I don’t have much use for creating custom yard signs, but I am always amazed at the great, creative marketing ideas you come up with and your generosity in sharing that information with the real estate community. Also, the level of effort you put into marketing your listings is nothing short of Herculean. If I ever have a home to sell in Phoenix, yours will be the first number I dial. Thanks for posting this information. Now I just have to figure out how to use it for my marketing.
May 23, 2008 — 6:55 pm
Hunter Jackson says:
Greg,
For us non-techies, where would you start? I barely can use paint to make a birthday card for my little sister muchless mac software.
Could I do this decently in photoshop?
May 23, 2008 — 7:08 pm
Todd Carpenter says:
Greg, how much CPU power are you packing? When I make a 300dpi 8.5″ X 11″ sheet of custom business cards on my core2 duo iMac, I can sense the machine slowing down. I can’t imagine what it takes to make a 25″ X 37″ image at that resolution.
May 23, 2008 — 7:27 pm
Robert Kerr says:
$450K? When was that? Zillow has 909 W Culver at $310K and lists it as an “amazing short sale.”
May 23, 2008 — 7:36 pm
Patrick says:
Greg,
I create my custom yard signs in Microsoft Publisher. Basically the same way I would create a flyer. At this point to keep all the signs uniform. I will open the previous sign in publisher, switch out the photos, description, and single property domain. Save it as a Jpeg, and email it over to http://www.wright-signs.com They fine tune it to what they need. A few days and $56. later, its done. I am very happy with the quality of the pictures, the next sign will have three different pictures on each side, same price. Yes I am quite techsimple.
View signs here
http://picasaweb.google.com/PJMahony/Desktop/photo?authkey=EKLibZ_1w10#5203769787343218834
Patrick
May 23, 2008 — 8:00 pm
Barbara says:
Hey!
This is a good idea!
Thank you!
May 23, 2008 — 8:56 pm
Greg Swann says:
> Could I do this decently in photoshop?
If you had Adobe Creative Studio 3 on a robust computer, you would have what you need. But that’s a huge investment in money and in learning curve. Talk to your sign vendor and see what they’re willing to do for you and for how much. They’re used to solving graphic problems like this.
May 23, 2008 — 10:16 pm
Greg Swann says:
> Greg, how much CPU power are you packing?
Not enough. I’m on a Motorola G5 iMac. Cathy has a dual core iMac, and I can feel the speed when I render movies on her machine. My next Mac may be the 8-core, just for problems like these. For now, when I import the big EPS, I set it up and then go take a shower. I’m right at the bleeding edge of can’t-do-it on my current hardware.
May 23, 2008 — 10:20 pm
Greg Swann says:
> $450K? When was that?
Spring of 2007. We had multiple offers, multiple counters, sold it in five days for full price, $30,000 over the pre-listing appraisal we had done. We know about the short sale. In a normal market, that house would be avidly sought, a stunning historic in a choice location. Our site for it is still up, if you want to take a closer look. We haven’t seen the changes made since we sold it. I’m sorry to see the current owners lose it. They’re very sweet people.
May 23, 2008 — 10:26 pm
Greg Swann says:
> the next sign will have three different pictures on each side
I think this is a brilliant idea. I want to talk more about what you’re doing in the next day or two.
May 23, 2008 — 10:28 pm
Ann Cummings says:
I like the idea of these custom signs, and I really like the looks of the one that Patrick linked to – very nicely done, clean and crisp looking.
May 24, 2008 — 2:51 am
Rob says:
>I create my custom yard signs in Microsoft Publisher.
Patrick… could you send me your Publisher template?
Great sign too!
robt@pacific.net
May 24, 2008 — 9:39 am
Barry Bevis says:
As I wrote before my Cousin owns the sign shop I use and she does all my layout and design… Cant complain about that.
Reports back are favorable.
Walkers stopping and reading, Cars pulling into the drive, neighbors with homes up for sale in the area “fondling” the sign (my sellers words not mine)
The best part is all of my showings are about the feel of the house- not price, not finish, not just wanting to see inside. They already know they like it and can afford it- they just want to experience it IRL…
Talk about a qualified lead!
May 25, 2008 — 9:28 am
Judy Orr says:
I love these signs yet was on the fence about the practicality of creating these “single property signs” – I’m already doing the single property sites. But Barry’s comment is making me lean towards trying it – especially because of his mention of other sellers fondling it.
With today’s expired rate, this might just get my foot in more doors! Greg, you might have shared this before but I can’t remember. How much do you pay per sign? Is it near the $56 Patrick is paying? I’ve got a pretty reasonable sign guy that might be able to work with me just using the ideas I’ve received here and will tell me what kind of photos he needs.
May 26, 2008 — 8:39 pm
Greg Swann says:
We’re about $250 for a full set of signs. Patrick’s signs are smaller, but he’s still getting a smokin’ deal. Shop around for price, but turnaround time and quality matter, too. If you’re in a very sunny climate, ask about UV inks. The inks you could get away with in Boston would fade to white in Phoenix in no time flat.
May 26, 2008 — 9:06 pm
Greg Swann says:
Also: We print onto a self-adhesive vinyl material which is then mounted onto an aluminum sheet. You can print direct to choroplast, which is cheaper, but the color won’t be as rich. We do our custom directionals that way so we can buy spares; they tend to walk away.
May 26, 2008 — 9:09 pm